To continue with the Oracle API Platform setup, an API Gateway node must be installed and registered with the Oracle API Platform Cloud instance. The API Gateway node can be installed on-premise or on any other vendor cloud instance.
In this post (Part 2), I will cover the steps involved with installing and registering the API Gateway. The Gateway installation can be downloaded from the API Management Portal or by using wget.
I will be installing the API Gateway on an Oracle Linux Virtual Machine instance (version 6.4) on my local machine. This will be the equivalent of installing the API Gateway on-premise. Finally, I will show the API Gateway registered with the Oracle API Platform instance already running in Oracle Cloud.
Oracle Documentation for installing the API Gateway can also be found here.
1. Download the API Gateway installer from the API Management Portal via the Oracle API Platform Cloud Service you have set up (URL https://API_PLATFORM_IP:PORT/apiplatform/gateways):

The API Gateway can also be downloaded using wget:
wget --keep-session-cookies --save-cookies cookies.txt --post-data='j_username=API_USERNAME&j_password=API_USER_PASSWORD' --no-check-certificate https://API_PLATFORM_IP/apiplatform/public/j_security_check
wget --load-cookies cookies.txt --no-check-certificate https://API_PLATFORM_IP/apiplatform/downloads/ApicsGatewayInstaller.zip
2. The downloaded archive 'ApicsGatewayInstaller.zip' contains installation and configuration files. The archive is just over 1GB:

3. My installation of the API Gateway will mimic an On-Premise installation, therefore the System Requirements from the Oracle Documentation is as follows:
Operating Systems
Oracle Linux and Red Hat Enterprise Linux 7.2, 6.7, and 6.4.
Microsoft Windows 10 supported for development and testing only
Microsoft Windows Server 2016 supported for production
CPU
Dual core, 2 GHz or more per CPU
Disk Space
30 GB
Memory
6 GB
JDK version
Oracle-Certified Java SE JDK 8. OpenJDK is not supported.
Python version (With OpenSLL Support)
2.7.10+
Note: This is required only for Windows installs. If installing on Linux, the version of Python bundled with the installer is used.
Open SSL version
1.0.0+
Note: This is required only for Windows installs. If installing on Linux, the version of Open SSL bundled with the installer is used.
4. The machine for the API Gateway to be installed on is a pre-built Oracle Linux 6.4 Virtual Machine.
Initially, I built an Oracle Linux 7.2 Virtual Machine from scratch but my API Gateway installation faced installation issues, most likely due to missing configuration of the VM itself, I needed to spend more time setting it up. In the end, to save time and continue with the progress, I decided to use a pre-built Oracle VM (containing Oracle Fusion Middleware components such as WebLogic, WebCenter Portal etc - Oracle WebCenter Portal 12.2.1 - Virtual Machine. List of pre-built VM's here).


$ export CONFIG_JVM_ARGS=-Djava.security.egd=file:/dev/./urandom
Note: The above command should not be run on Production environments. If the low entropy issue occurs on Production, then involve the OS administrators!


Useful Things to know:Initially, I built an Oracle Linux 7.2 Virtual Machine from scratch but my API Gateway installation faced installation issues, most likely due to missing configuration of the VM itself, I needed to spend more time setting it up. In the end, to save time and continue with the progress, I decided to use a pre-built Oracle VM (containing Oracle Fusion Middleware components such as WebLogic, WebCenter Portal etc - Oracle WebCenter Portal 12.2.1 - Virtual Machine. List of pre-built VM's here).
The 6.4 version of the VM satisfied the minimum OS requirement. The VM was loaded into VirtualBox and ready to be used as an environment for the API Gateway to be installed on:

5. Boot up the VM and copy/migrate ApicsGatewayInstaller.zip to a local folder:

6. Before progressing with the installation, we need to satisfy other minimum requirements:
- Oracle JDK 8+
- Python 2.7.10+ (with OpenSSL support)
7. The VM I am using comes with OpenJDK by default, this needs to be replaced with Oracle JDK. Follow one of my previous blogposts if you are in this situation OR do what you got to do to satisfy the Oracle JDK 8+ requirement. I installed Oracle JDK 8 update 77:

8. Check what version of Python you have (if installed) 'python --version'.
We want to ensure 2.7.10 is installed. The Oracle VM's and Linux Machines will most likely be installed with Python 2.6 - This is used by the operating system and tools such as yum. DO NOT uninstall the existing Python as it may result in the OS malfunctioning due to dependencies!
Follow the steps at How to Compile and Install Python with OpenSSL Support. Steps are clear and easy to follow. (The steps are based on installing Python 3.5.1, but replace with 2.7.10 instead).
9. After the install, to run Python 2.7.10, it can be accessed from '/usr/local/bin/python2.7'. When we run commands for the API Gateway, we will run the with an absolute path Python from that directory to ensure the correct version of Python is utilised:

10. Change directory to where you copied ApicsGatewayInstaller.zip and unzip it:

11. Within the extracted files is the important json file that contains configuration properties used by the API Gateway installation - 'gateway-props.son'. By default, it looks like:

12. We need to update the 'gateway-props.json' to match respective requirements such as the API Management Portal IP/Port etc. It is important that you get these properties correct, refer to the Oracle Documentation for an indepth explanation of each mandatory/optional property that can be entered.
My 'gateway-props.son' on my VM instance looks like the following:
{
"gatewayInstallDir" : "/u01/app/oracle/gateway/run",
"installationArchiveLocation" : "/u01/app/oracle/gateway-installer/archived-install/archive1",
"prevInstallCleanupAction" : "clean",
"gatewayNodeName" : "OS-GatewaynNode1",
"managementServerHost" : "https://144.21.72.78",
"managementServerPort" : "443",
"nonProxyHosts" : "localhost",
"listenIpAddress" : "10.0.2.15",
"publishAddress" : "10.0.2.15",
"gatewayExecutionMode": "Development",
"gatewayNodeDescription" : "wcp12cr2",
"gatewayDomainName" : "gateway1",
"logicalGateway" : "OS-LogicalGateway1",
"opatchesFolder" : "/u01/app/oracle/gateway-patches",
"gatewayMServerPort" : "8000",
"gatewayMServerSSLPort" : "8443"
}

My 'gateway-props.son' on my VM instance looks like the following:
{
"installationArchiveLocation" : "/u01/app/oracle/gateway-installer/archived-install/archive1",
"prevInstallCleanupAction" : "clean",
"gatewayNodeName" : "OS-GatewaynNode1",
"managementServerHost" : "https://144.21.72.78",
"managementServerPort" : "443",
"nonProxyHosts" : "localhost",
"listenIpAddress" : "10.0.2.15",
"publishAddress" : "10.0.2.15",
"gatewayExecutionMode": "Development",
"gatewayNodeDescription" : "wcp12cr2",
"gatewayDomainName" : "gateway1",
"logicalGateway" : "OS-LogicalGateway1",
"opatchesFolder" : "/u01/app/oracle/gateway-patches",
"gatewayMServerPort" : "8000",
"gatewayMServerSSLPort" : "8443"
}

13. Oracle Documentation guides the installation in a way for multiple commands to be run at once resulting in the Gateway installed all the way up to joining the API Platform in one command: 'install-configure-start-creategateway-join'.
We do NOT want to run all commands at once, we will run these commands separately and verify at each step. This ensures that if there are any errors, we know at exactly what command there was a problem. A total of 5 steps will be run in the following order:
We do NOT want to run all commands at once, we will run these commands separately and verify at each step. This ensures that if there are any errors, we know at exactly what command there was a problem. A total of 5 steps will be run in the following order:
- install - Installs API Gateway binaries.
- configure - Configures the API Gateway Weblogic domain.
- start - Starts the API Gateway Admin server, Managed server and a lightweight Java DB.
- creategateway - Connects to the Management Portal and creates a Logical Gateway. A unique Gateway ID is returned and will be used in the join step.
- join - Requests for the API Gateway Node to join the Logical Gateway. This requires approval from an API Gateway Manager user on the Management Portal to allow successful pairing.
14. Set JAVA Home: Before running the commands, ensure the JAVA_HOME is set:
$ export JAVA_HOME=/usr/java/jdk1.8.0_77/
15. Set Low Entropy (Non Prod environments): Ensure low entropy is set (see Useful Notes at the end of the post for more information):$ export JAVA_HOME=/usr/java/jdk1.8.0_77/
$ export CONFIG_JVM_ARGS=-Djava.security.egd=file:/dev/./urandom
Note: The above command should not be run on Production environments. If the low entropy issue occurs on Production, then involve the OS administrators!
16. Before running the next command, ensure the root folder /u01 is initially created and make sure your user has atleast RW permissions to it, else you will face Permission Denied errors.
17. install: Run the following command:
$ /usr/local/bin/python2.7 APIGateway.py -f gateway-props.json -a install
Note: Running the install command will ask you for a weblogic username and password. This step creates the admin user and is granted weblogic rights. Keep a note of the credentials, going forward with other commands, you must enter the same credentials else changes will not be possible:


18. configure: Run the following command:
$ /usr/local/bin/python2.7 APIGateway.py -f gateway-props.json -a configure
Enter the weblogic credentials when prompted:

19. start: Run the following command:
$ /usr/local/bin/python2.7 APIGateway.py -f gateway-props.json -a start
Enter the weblogic credentials when prompted and wait for the servers to start. I initially encountered the low entropy issue which caused the servers to take forever booting up. I found that the request to start the servers automatically ends after about 10 minutes or so, if they still have not started:


20.1 Confirm that the servers have successfully started by accessing WebLogic Console and logging in with the credentials created during the install step:
http://listenerIPAddress:8001/console

20.2 Take a look at the Managed servers that have been created (An Admin server and a Gateway Node server):

20.3 Click on the Gateway Node managedServer1 and see the Listen Address, Listen Port and SSL Listen Port. They match the properties from the gateway-props.json used to configure the Gateway:

21. creategateway: Run the following command:
$ /usr/local/bin/python2.7 APIGateway.py -f gateway-props.json -a creategateway
Enter the weblogic credentils when prompted.
Enter the Gateway Manager user when prompted (set up in the API Management Portal - you can use the main user that was used to create the API Platform if needed).
Enter the Gateway Manager Runtime user (same as above).
Note: For the simplicity of this blogpost, I am using the Administrator Weblogic user for all credentials. Ideally, we would have multiple users each assigned with the respective Gateway role. This can be managed through the Roles tab in the API Management Portal.
Note: For the simplicity of this blogpost, I am using the Administrator Weblogic user for all credentials. Ideally, we would have multiple users each assigned with the respective Gateway role. This can be managed through the Roles tab in the API Management Portal.
If the logical Gateway is created successfully, it will return a Gateway ID. Make a note of this ID (we can see the ID returned is 101):


22. To verify the logical Gateway is created, log into the API Management Portal, click Gateways and check the newly created Gateway and also compare it's ID:


23. Before joining the logical Gateway, the 'gateway-props.json' must be updated with the gatewayId property:

24. join: Run the following command:
$ /usr/local/bin/python2.7 APIGateway.py -f gateway-props.json -a joingateway
Enter the weblogic credentils when prompted.
Enter the Gateway Manager user when prompted (set up in the API Management Portal - you can use the main user that was used to create the API Platform if needed).
Enter the Gateway Manager Runtime user (same as above).
If successful, one of the last messages will be 'Join request sent, please login to the APICS portal as gateway manager to approve the request':


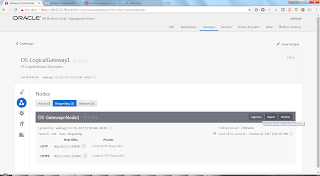
25. Log back into the API Management Portal, click Gateways, click the Nodes icon, click the Requesting tab and we should see our Gateway Node trying to join:

26. Hover over the Gateway Node name and Approve, Reject, Dismiss options should appear on the right:

27. Click Approve and a description for your action (useful if you are Rejecting the Join request):

28. Now, we will see the Gateway Node under the Active tab:


28. Now, we will see the Gateway Node under the Active tab:

29. One final look to check our API Gateway Node status and confirm all is as expected:

That's it folks, well done! The fundamentals of the API Platform Cloud Service are complete. In Part 3, I will create and deploy a sample API Application and show the Platform working end to end.
1. Logs: If you encounter failures or issues, inspect the Gateway logs that are created. These will contain more information than what is displayed in the terminal when configuring the Gateway.
2. Starting the servers taking too long: This can be due to there not being enough entropy (randomness) in the OS. This can be resolved with the following command:
$ export
CONFIG_JVM_ARGS=-Djava.security.egd=file:/dev/./urandom
3. Domain Administrator validation: Initially, when I tried to install the gateway, it failed. After investigating the logs, my domain administrator username/password vailed validation checks. (I set the password as 'welcome1'). The validation checks are:

3. Domain Administrator validation: Initially, when I tried to install the gateway, it failed. After investigating the logs, my domain administrator username/password vailed validation checks. (I set the password as 'welcome1'). The validation checks are:
3. Polling: The API Gateway Node will poll the Logical Gateway on the cloud or 'phone home' every X minutes to update it self with the latest deployed API's, policies etc. This value can be modified on the API Management Portal - Gateway Node page. The interval value or interval type can be changed:

4. API Gateway Status - Make use of the status command to get a summary of the Statuses and other Useful information. I ran the status command before I created and joined the Logical Gateway:


4. API Gateway Status - Make use of the status command to get a summary of the Statuses and other Useful information. I ran the status command before I created and joined the Logical Gateway:

5. Best practises & Lessons learnt: Luis Weir has posted a helpful presentation covering these aspects, view the presentation on Slide Share here.
Excellent post!!! Do i need to enable a white list or enable some ports in my environments behind DMZ?
ReplyDeleteHi Hernan.
DeleteEnsure that API Gateway servers are able to access the internet via the standard ports (443 etc). No other ports should require enabling, the API Gateway running in your environment will perform 1 way transport to send/collect information from the API Management Service running in the Cloud. The Cloud service never has to contact the Servers in your environment so not much of an issue with Firewalls etc!
Hi Onkar, Great work! In this post you described to install Oracle API Gateway with the best way and your writing skills are also great. Its informative post and I really appreciate you for your work. Thanks!
ReplyDeleteThank you for providing and sharing good information to the students it will be very helpful to them for best career in future
ReplyDeleteOracle Fusion Financials Training In Hyderabad
Thank you very much for sharing valuable information that benefits to the students to select best course go on keep rocking.
ReplyDeleteOracle Fusion HCM Online Training
Thank you for sharing good information to the students it will be very helpful to them for Choosing best course.
ReplyDeleteOracle Taleo Online Training
I would like to thank you for the efforts you have made in writing this article. I am hoping the same best work from you in the future as well.
ReplyDeleteOracle Fusion Financials Online Training
thanks for your information visit us at Oracle Fusion Cloud Financials Training
ReplyDeleteawsome blog.
ReplyDeleteseo training in bangladesh
conventional medicine
ReplyDeleteA decent blog dependably thinks of new and energizing data and keeping in mind that understanding I have feel that this blog is truly have each one of those quality that qualify a blog to be an one.I needed to leave a little remark to help you and wish you a decent continuation. Wishing you the good luck for all your blogging endeavors.
Accountants Hove
ReplyDeleteAfter I read and endeavor to comprehend this article lastly amazingwe are for the most part appreciative for the presence of this article can include significantly more knowledge for every one of us. much obliged to you
Thank you for sharing good information.
ReplyDeleteOracle Fusion Financials Training in Hyderabad
Nice blog, thank you for sharing your information with us.See more: Oracle Fusion Financials Online Training
ReplyDeleteThe complete learning experience was really excellent from this institute and provides good article.
ReplyDeleteOracle Fusion Financials Training
nice blog.
ReplyDeleteOracle Fusion Financials Training in Bangalore
Wonderful information. For more details please visit us:
ReplyDeleteOracle Fusion HCM Training in Ameerpet
Excellent Blog very imperative good content, this article is useful to beginners and real time.
ReplyDeleteOracle Financials Training in Hyderabad
Nice and good article. It is very useful for me to learn and understand easily. Thanks for sharing your valuable information and time. Please keep updating mulesoft Online Training
ReplyDeleteThanks for sharing the useful information and good points were stated in this blog which is very informative and for the further information visit us at.
ReplyDeleteOracle Financials Training in Bangalore
This comment has been removed by the author.
ReplyDeleteThis comment has been removed by the author.
ReplyDeleteThank you for providing useful information and its best for the students to make good career.learn Python training course.Python Training in Hyderabad
ReplyDeleteThank you very much for sharing valuable information that benefits to the students to select best course go on keep rocking.
ReplyDeletesap-fico
ReplyDeleteThanks for sharing amazing information about python .Gain the knowledge and hands-on experience in python online training
Thank you for providing useful information and this is the best article blog for the students.learn Oracle Fusion Financials Online Training.
ReplyDeleteOracle Fusion Financials Online Training
This comment has been removed by the author.
ReplyDeleteThanks for sharing this information
ReplyDeleteaws course in Bangalore
aws training center in Bangalore
cloud computing courses in Bangalore
amazon web services training institutes in Bangalore
best cloud computing institute in Bangalore
cloud computing training in Bangalore
aws training in Bangalore
aws certification in Bangalore
best aws training in Bangalore
aws certification training in Bangalore
Thanks for sharing such a nice blog
ReplyDeletebest android training center in Marathahalli
best android development institute in Marathahalli
android training institutes in Marathahalli
ios training in Marathahalli
android training in Marathahalli
mobile app development training in Marathahalli
The blog was absolutely fantastic! Lot of information is helpful in some or the other way. Keep updating the blog, looking forward for more content...Great job, keep it up
ReplyDeleteWorkday HCM Online Training!
Oracle Fusion Financials Online Training
Oracle Fusion HCM Online Training
Oracle Fusion SCM Online Training
Thanks for sharing a useful information.. we have learned so much information from your blog..... keep sharing
ReplyDeleteOracle Fusion Financials Online Training
Oracle Fusion HCM Online Training
Oracle Fusion SCM Online Training
Nice Blog Thankyou for sharing..
ReplyDeleteReally nice and interesting.best sap oracle cloud training
Best Article BUY ADDERALL ONLINE Excellent post. I appreciate this site. Stick with it! Because the admin of this web page is working, no doubt very quickly it will be well-known, due to its quality contents.This website was how do you say it? Relevant!! Finally, I’ve found something that helped me.
ReplyDeleteReally a awesome blog for the freshers. Thanks for posting the information.https://www.bangaloretrainingacademy.com/Cloud-Computing-Training-in-Bangalore.htmlhttps://www.bangaloretrainingacademy.com/Cloud-Computing-Training-in-Bangalore.html
ReplyDelete
ReplyDeleteThank you for sharing such a great information.Its really nice and informative.hope more posts from you. I also want to share some information recently i have gone through and i had find the one of the best mulesoft tutorial videos
Your content is very impressive and thank you for sharing this article. it's very useful.
ReplyDeleteGoogle Cloud Platform Training
GCP Online Training
Google Cloud Platform Training In Hyderabad
buy humalog kwikpen online
ReplyDeletebuy lantus solostar pen online
buy novolog flextouch pens online
buy basaglar kwikpen online
buy apidra solostar pens online
buy apidra insulin vail online
buy ozempic online
buy saxenda online
buy Toujeo solostar pen online
buy victoza online
buy trulicity online
buy adipex-p online
buy belviq online
buy orlistat online
buy meridia online
buy contrave online
buy insuline online
I am so proud of you and your efforts and work make me realize that anything can be done with patience and sincerity. Well I am here to say that your work has inspired me without a doubt. Here is i want to share about mulesoft developer training and mulesoft training with Free Bundle videos.
ReplyDeleteYour site is amazing and your blogs are informative and knowledgeable to my websites.This is one of the best tips in my life. I have in quite some time.
ReplyDeleteNicely written and great info.Thanks to share the more information's. PHP Training in Chennai | Certification | Online Training Course | Machine Learning Training in Chennai | Certification | Online Training Course | iOT Training in Chennai | Certification | Online Training Course | Blockchain Training in Chennai | Certification | Online Training Course | Open Stack Training in Chennai |
Certification | Online Training Course
Thank you very much for sharing keep writing more blogs
ReplyDeleteservicenow admin training
servicenow administrator certification
servicenow admin training online
servicenow administrator training
servicenow admin certification
servicenow admin training online
servicenow admin online training
Amazing blog thanks for sharing
ReplyDeleteservicenow admin training online
servicenow administrator training
Those guidelines additionally worked to become a good way to recognize that other people online have the identical fervor like mine to grasp a great deal more around this condition. and I could assume you are an expert on this subject. Same as your blog i found another one Oracle Taleo .Actually I was looking for the same information on internet for Oracle Taleo and came across your blog. I am impressed by the information that you have on this blog. Thanks a million and please keep up the gratifying work.
ReplyDeleteCognex is the best and ablest in teaching AWS, MICROOSFT AZURE, PRINCE 2 FOUNDAITON etc, And cognex called as best AWS Training in chennai
ReplyDeleteI enjoyed your blog. Thanks for sharing such an informative post. We are also providing the best services click on below links to visit our website.
ReplyDeleteOracle Fusion HCM Training
Workday Training
Okta Training
Palo Alto Training
Adobe Analytics Training