Error when launching Eclipse IDE - Failed to create the Java Virtual Machine

When I installed the Eclipse IDE and tried to launch it, I came across the following error: "Failed to create the Java Virtual Machine".

To fix this, go through the following steps:

1. Navigate to the Eclipse installation folder

2. Open eclipse.ini with a notepad editor (Create a backup of this file first!).

3. The original eclipse.ini file will look like the following:

4. Make note of the 'requiredJavaVersion' entry and ensure you have a jdk installed meeting that version. In this example, it is 1.8, so i installed jdk1.8.0_171 under "C:\Program Files\Java"

Before the -vmargs line, insert the following entry:

-vm
C:\Program Files\Java\jdk1.8.0_171\bin\javaw.exe

Note: Replace the path to your installed jdk version appropriately.

Your modified eclipse.ini will now look something like the following:


5. Save your file.

6. Try running Eclipse.exe again and voila! :)

PaaS - How to setup an Oracle Integration Cloud instance

What is Oracle Cloud Integration?
As you may be aware, Oracle have released the next installment of their PaaS Integration products: Oracle Integration Cloud. Don't be alarmed, the Oracle Integration Cloud is not a brand new product, but it is rather a bundle of existing PaaS offerings.

A new option has been added under the PaaS Integration options: 'App Integration' (Oracle Integration Cloud).


Oracle Integration Cloud comes with:
  • Integrations (ICS)
  • Processes (PCS)
  • Visual Builder (VBCS, previously known as ABCS)
  • Insights / Integration Analytics
Oracle Integration Cloud, Oracle's compelling new cloud offering combines Application Integration, Process Automation, Visual Application Building and Integration Analytics into one unified cloud service. 

It can be confusing when comparing to the previous singular offerings, but here is a good summary of OIC/ICS/SOACS by Phil Wilkins: Blogpost


Oracle Cloud Integration instance

Now let's crack on with creating an Oracle Integration Cloud instance:

There are pre-requisites before setting up Oracle Integration Cloud. You must have the following Oracle Cloud Services already setup:

1. Oracle Storage Container (See blogpost here)
2. Oracle Cloud Database (See blogpost here)


1. Once logged into Oracle Cloud, from the Dashboard menu, click on the 'Integration Cloud' option:


2. On the Oracle Integration Cloud Service page, click 'Create Service':


3. Integration Cloud - Specify details for your Integration Cloud:


4. Integration Cloud Details - Specific details for your Integration Cloud: 

Note: Feature Set by default is 'Integration and Process', this means your OIC instance will consist of both Integration and Process (and the supporting tools). You can decide to select only Integration, this will mean your instance will not include Process. Think of an On-prem set up of the SOA Suite, you could have only the SOA Suite, but you can also have the SOA Suite with BPM.

Note 2: Cloud instances of Storage Container and an Oracle Database were pre-requisites, and the details will be entered here.


5. Integration Cloud Details Confirmation:


6. After clicking create, you will be redirected to the Integration Cloud Services page where you will see your new Integration Cloud instance with a Status of 'Creating Service':


7. Provisioning of your Integration Cloud instance takes just under an hour. Quite a lot going on behind the scenes. I cooked and ate my dinner during the provisioning, and just as I had finished, I received an email from Oracle notifying that my Integration Cloud instance was ready to use. :)


8. Click on your Integration Cloud instance to view an overview of the topology. Click on the services icon to view links to the instance Enterprise Manager, Admin Console or the Integration Cloud Home Page:


9. Click on 'Open Integration Cloud Home Page' and you will be taken to where all the magic will happen!


In further blogposts, I will cover some examples of Integrations, Processes and Visual Builder (Zero code apps). Stay tuned!


PaaS - How to Manage and Access an API with Oracle API Platform Cloud (Part 3)

In previous posts, we learnt how to set up an Oracle API Platform Cloud Service, then Install the Oracle API Gateway and register it with the API Platform Cloud instance:

In this post, I will cover the following:
  • Create a simple REST based service.
  • Deploy the service to a separate WebLogic Managed server instance (used to host deployed applications).
  • Create the API entry within the Oracle API Platform Cloud instance and point to the service on the application WebLogic Managed server.
  • Allow the Oracle API Gateway to poll the Logical Gateway / 'phone home' and fetch the API, Policies etc.
  • Attempt to access the service via the Oracle API Gateway Node.
  • If all goes well, we will be routed to the deployed service and will use the Analytics tool on the API Management Portal to confirm the end-to-end activity.

Notes: 
  • I am covering a simple end to end. No additional Policies are applied to the API.
  • I am using the main Administrator user (weblogic) for all activities. Ideally, we would have users assigned to x and y roles to perform respective tasks. 
  • The IP addresses of the Application managed server and Gateway Node are being used rather than Load Balancer URL's - Ideally, the servers will be placed behind an LB and the LB URL will be utilised in the API Management implementation.

Firstly, create and deploy an API service to an Application server

1. I have created a REST service - I won't go in-depth too much in terms of the coding, but I have used JDeveloper to create a simple service and when invoked, will return a JSON response:


2. The REST Service has been deployed to a WebLogic Managed server:


3. Now, I call the REST service directly from the Managed Server it has been deployed on. URL:

http://wcp12cr2:7001/apiblog/resources/helloworldpath


Next is where the fun starts: Let's manage the above service with Oracle API Platform Cloud

4. Log into your API Management Portal (https://CLOUD_IP/apiplatform):


5. By default, you will land on the APIs page:


6. Now, let's continue to create our first API entry. The 'View Documentation' directs you to the following Oracle Documentation. Click 'Create API':


7. Populate the Name, Version and Description of your API:


8. An API Container will be created:


9. Click on the new API so we can continue to populate the implemenation details:


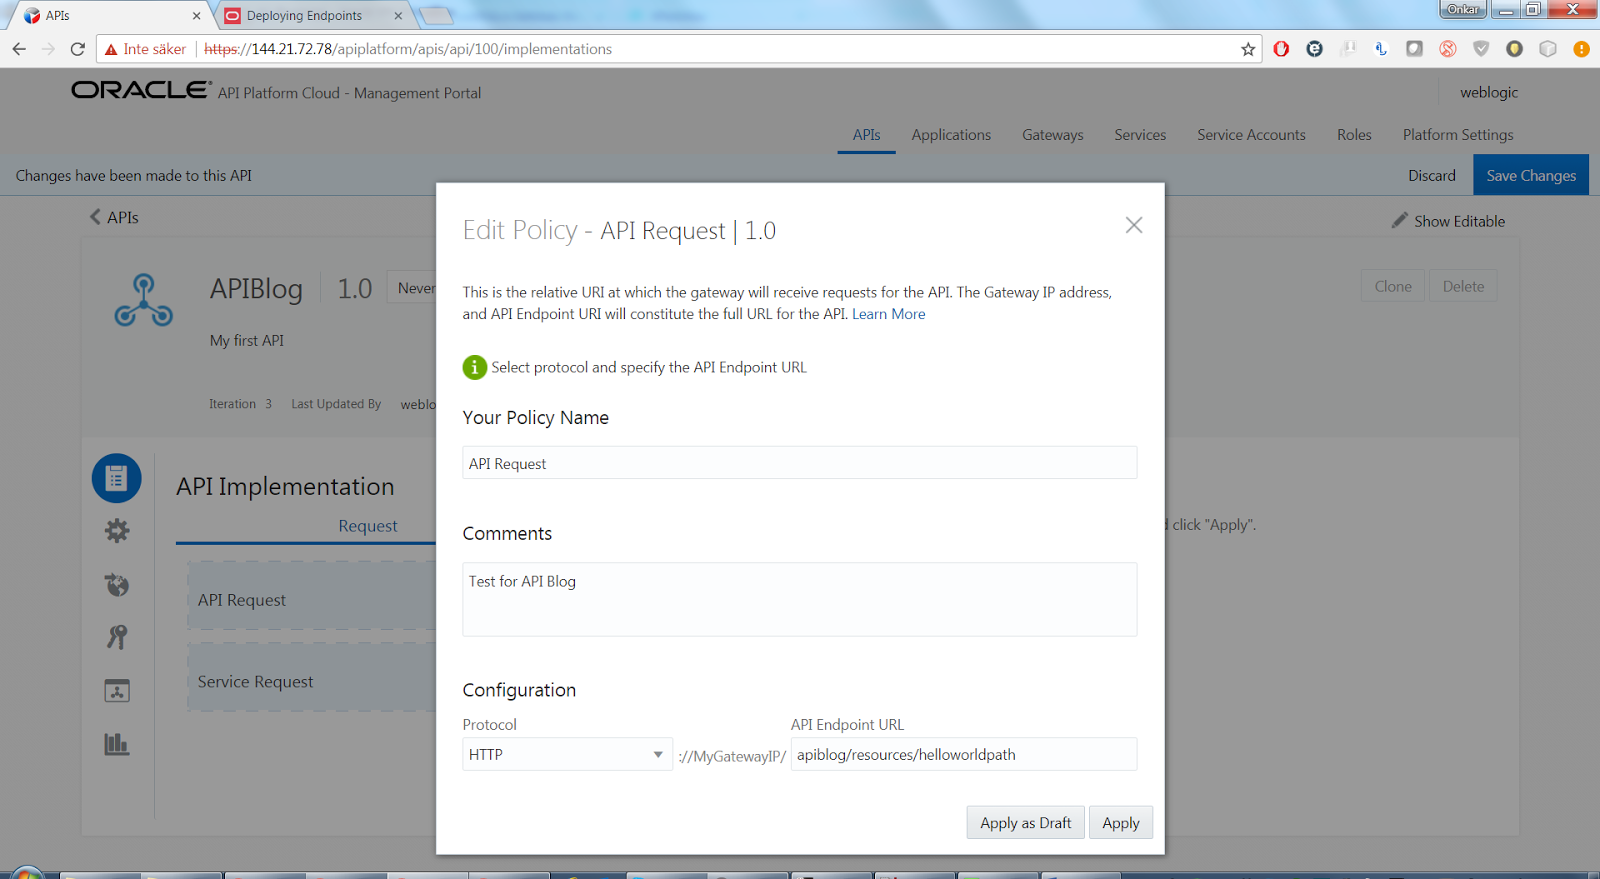
10. Hover over 'API Request' and click 'Edit':


11. In the 'Edit Policy' dialog, populate the API Endpoint URL of your deployed service:


12. Click Apply. The 'API Request' box will be updated with the URL. In the top right, click 'Save Changes':


13. Hover over 'Service Request' and click 'Edit':


14. In the Edit Policy dialog, select 'Enter a URL' and enter the URL to the REST service created above. In this case, it is http://wcp12cr2:7001/apiblog/resources/helloworldpath


15. Click Apply. The 'Service Request' box will be updated with the URL. In the top right, click 'Save Changes':


Next, we will begin the process of Deploying the API to our Gateway Node

16. Confirm our Gateway Node is running by using the status command to ensure the Gateway will fetch the deployed API:


17. If for any reason, the Gateway Node is not running, we can still continue with the API Deployment. The Gateway Node will perform a fetch when it comes back online.


18. Before we deploy the API, I want to show an unresolved request of accessing the service through the Gateway managed server. We will then access the same request again after the deployment to show that the Gateway has pulled down our deployed API correctly:


19. Back on the Management Portal, click on the 'Deployments' icon from the left:


20. Click on 'Deploy API':


21. Select our Gateway Node instance that was previously configured and then click 'Deploy':


22. Now, a request for Deployment will be Submitted. Click on the 'Waiting' tab to see the request:


23. Let's move onto approving the Request.


24. Click on 'Gateways' > Click on the Logical Gateway we have selected to deploy to > Click on the 'Deployments' icon. Our request has automatically moved to 'Waiting'. Typically, the Request would appear under 'Requesting' but this step has been skipped because I have used the Administrator user (weblogic) to create the Deployment Request. If the request appears under 'Requesting', then a Gateway Manager user must Approve the request first. Then the Request will move to 'Waiting':


25. Note: Once Deployments have been Requested and Approved, they will automatically appear under the 'Waiting' tab. This means that Requests will be processed once the Gateway Node polls the Logical Gateway or 'phones home'. (Clever eh!)


26. Once the Gateway Node has polled our Deployment(s), the Request should move from 'Waiting' to 'Deployed' automatically:


27. Now for the big finale! We are ready to access our service via the Gateway URL:

http://10.0.2.15:8000/apiblog/resources/helloworldpath


28. Success! JSON Response has been returned. 


Next, let's take a look at the Analytics within the API Management Portal

29. In the Logical Gateway instance, click on the 'Analytics' icon:


30. We can assess several types of statistics for the requests we have made:


That's it! Our simple end-to-end has been implemented and tested. In my next blogposts, I will focus on integrating our API Platform with Apiary for a focus on API First design. I will explore applying Policies such as Authentication etc. on the above solution.

- OS.

PaaS - How to install Oracle API Gateway and register with Oracle API Platform Cloud Service (Part 2)

In a previous post, I covered the steps to create an Oracle API Platform Cloud Service instance: PaaS - How to setup Oracle API Platform Cloud Service (Part 1).

To continue with the Oracle API Platform setup, an API Gateway node must be installed and registered with the Oracle API Platform Cloud instance. The API Gateway node can be installed on-premise or on any other vendor cloud instance.

In this post (Part 2), I will cover the steps involved with installing and registering the API Gateway. The Gateway installation can be downloaded from the API Management Portal or by using wget.

I will be installing the API Gateway on an Oracle Linux Virtual Machine instance (version 6.4) on my local machine. This will be the equivalent of installing the API Gateway on-premise. Finally, I will show the API Gateway registered with the Oracle API Platform instance already running in Oracle Cloud.

Oracle Documentation for installing the API Gateway can also be found here.

1. Download the API Gateway installer from the API Management Portal via the Oracle API Platform Cloud Service you have set up (URL https://API_PLATFORM_IP:PORT/apiplatform/gateways):

The API Gateway can also be downloaded using wget:
wget --keep-session-cookies --save-cookies cookies.txt --post-data='j_username=API_USERNAME&j_password=API_USER_PASSWORD' --no-check-certificate https://API_PLATFORM_IP/apiplatform/public/j_security_check

wget --load-cookies cookies.txt --no-check-certificate https://API_PLATFORM_IP/apiplatform/downloads/ApicsGatewayInstaller.zip


2. The downloaded archive 'ApicsGatewayInstaller.zip' contains installation and configuration files. The archive is just over 1GB:


3. My installation of the API Gateway will mimic an On-Premise installation, therefore the System Requirements from the Oracle Documentation is as follows:


Operating Systems
Oracle Linux and Red Hat Enterprise Linux 7.2, 6.7, and 6.4.
Microsoft Windows 10 supported for development and testing only
Microsoft Windows Server 2016 supported for production

CPU
Dual core, 2 GHz or more per CPU

Disk Space
30 GB

Memory
6 GB

JDK version
Oracle-Certified Java SE JDK 8. OpenJDK is not supported.

Python version (With OpenSLL Support)
2.7.10+
Note: This is required only for Windows installs. If installing on Linux, the version of Python bundled with the installer is used.

Open SSL version
1.0.0+
Note: This is required only for Windows installs. If installing on Linux, the version of Open SSL bundled with the installer is used.


4. The machine for the API Gateway to be installed on is a pre-built Oracle Linux 6.4 Virtual Machine. 

Initially, I built an Oracle Linux 7.2 Virtual Machine from scratch but my API Gateway installation faced installation issues, most likely due to missing configuration of the VM itself, I needed to spend more time setting it up. In the end, to save time and continue with the progress, I decided to use a pre-built Oracle VM (containing Oracle Fusion Middleware components such as WebLogic, WebCenter Portal etc - Oracle WebCenter Portal 12.2.1 - Virtual Machine. List of pre-built VM's here).


The 6.4 version of the VM satisfied the minimum OS requirement. The VM was loaded into VirtualBox and ready to be used as an environment for the API Gateway to be installed on:


5. Boot up the VM and copy/migrate ApicsGatewayInstaller.zip to a local folder:


6. Before progressing with the installation, we need to satisfy other minimum requirements:
  • Oracle JDK 8+
  • Python 2.7.10+ (with OpenSSL support)


7. The VM I am using comes with OpenJDK by default, this needs to be replaced with Oracle JDK. Follow one of my previous blogposts if you are in this situation OR do what you got to do to satisfy the Oracle JDK 8+ requirement. I installed Oracle JDK 8 update 77:


8. Check what version of Python you have (if installed) 'python --version'. 
We want to ensure 2.7.10 is installed. The Oracle VM's and Linux Machines will most likely be installed with Python 2.6 - This is used by the operating system and tools such as yum. DO NOT uninstall the existing Python as it may result in the OS malfunctioning due to dependencies!

Follow the steps at How to Compile and Install Python with OpenSSL Support. Steps are clear and easy to follow. (The steps are based on installing Python 3.5.1, but replace with 2.7.10 instead).


9. After the install, to run Python 2.7.10, it can be accessed from '/usr/local/bin/python2.7'. When we run commands for the API Gateway, we will run the with an absolute path Python from that directory to ensure the correct version of Python is utilised:


10. Change directory to where you copied ApicsGatewayInstaller.zip and unzip it:


11. Within the extracted files is the important json file that contains configuration properties used by the API Gateway installation - 'gateway-props.son'. By default, it looks like:


12. We need to update the 'gateway-props.json' to match respective requirements such as the API Management Portal IP/Port etc. It is important that you get these properties correct, refer to the Oracle Documentation for an indepth explanation of each mandatory/optional property that can be entered.

My 'gateway-props.son' on my VM instance looks like the following:

{
   "gatewayInstallDir" : "/u01/app/oracle/gateway/run",
   "installationArchiveLocation" : "/u01/app/oracle/gateway-installer/archived-install/archive1",
   "prevInstallCleanupAction" : "clean",
   "gatewayNodeName"   : "OS-GatewaynNode1",
   "managementServerHost"    : "https://144.21.72.78",
   "managementServerPort"    : "443",
   "nonProxyHosts"           : "localhost",
   "listenIpAddress"         : "10.0.2.15",
   "publishAddress"      :  "10.0.2.15",
   "gatewayExecutionMode": "Development",
   "gatewayNodeDescription" : "wcp12cr2",
   "gatewayDomainName" : "gateway1",
   "logicalGateway" : "OS-LogicalGateway1",
   "opatchesFolder" : "/u01/app/oracle/gateway-patches",
   "gatewayMServerPort" : "8000",
   "gatewayMServerSSLPort" : "8443"
}


13. Oracle Documentation guides the installation in a way for multiple commands to be run at once resulting in the Gateway installed all the way up to joining the API Platform in one command: 'install-configure-start-creategateway-join'. 

We do NOT want to run all commands at once, we will run these commands separately and verify at each step. This ensures that if there are any errors, we know at exactly what command there was a problem. A total of 5 steps will be run in the following order:
  • install - Installs API Gateway binaries.
  • configure - Configures the API Gateway Weblogic domain.
  • start - Starts the API Gateway Admin server, Managed server and a lightweight Java DB.
  • creategateway - Connects to the Management Portal and creates a Logical Gateway. A unique Gateway ID is returned and will be used in the join step.
  • join - Requests for the API Gateway Node to join the Logical Gateway. This requires approval from an API Gateway Manager user on the Management Portal to allow successful pairing.


14. Set JAVA Home: Before running the commands, ensure the JAVA_HOME is set:

$ export JAVA_HOME=/usr/java/jdk1.8.0_77/


15. Set Low Entropy (Non Prod environments): Ensure low entropy is set (see Useful Notes at the end of the post for more information):

$ export CONFIG_JVM_ARGS=-Djava.security.egd=file:/dev/./urandom

Note: The above command should not be run on Production environments. If the low entropy issue occurs on Production, then involve the OS administrators!


16. Before running the next command, ensure the root folder /u01 is initially created and make sure your user has atleast RW permissions to it, else you will face Permission Denied errors.


17. install: Run the following command: 

$ /usr/local/bin/python2.7 APIGateway.py -f gateway-props.json -a install

Note: Running the install command will ask you for a weblogic username and password. This step creates the admin user and is granted weblogic rights. Keep a note of the credentials, going forward with other commands, you must enter the same credentials else changes will not be possible:


18. configure: Run the following command:

$ /usr/local/bin/python2.7 APIGateway.py -f gateway-props.json -a configure

Enter the weblogic credentials when prompted:


19. start: Run the following command:

$ /usr/local/bin/python2.7 APIGateway.py -f gateway-props.json -a start

Enter the weblogic credentials when prompted and wait for the servers to start. I initially encountered the low entropy issue which caused the servers to take forever booting up. I found that the request to start the servers automatically ends after about 10 minutes or so, if they still have not started:


20.1 Confirm that the servers have successfully started by accessing WebLogic Console and logging in with the credentials created during the install step:

http://listenerIPAddress:8001/console


20.2 Take a look at the Managed servers that have been created (An Admin server and a Gateway Node server):


20.3 Click on the Gateway Node managedServer1 and see the Listen Address, Listen Port and SSL Listen Port. They match the properties from the gateway-props.json used to configure the Gateway:


21. creategateway: Run the following command:

$ /usr/local/bin/python2.7 APIGateway.py -f gateway-props.json -a creategateway

Enter the weblogic credentils when prompted.
Enter the Gateway Manager user when prompted (set up in the API Management Portal - you can use the main user that was used to create the API Platform if needed).
Enter the Gateway Manager Runtime user (same as above).

Note: For the simplicity of this blogpost, I am using the Administrator Weblogic user for all credentials. Ideally, we would have multiple users each assigned with the respective Gateway role. This can be managed through the Roles tab in the API Management Portal.

If the logical Gateway is created successfully, it will return a Gateway ID. Make a note of this ID (we can see the ID returned is 101):


22. To verify the logical Gateway is created, log into the API Management Portal, click Gateways and check the newly created Gateway and also compare it's ID:


23. Before joining the logical Gateway, the 'gateway-props.json' must be updated with the gatewayId property:


24. join: Run the following command:  

$ /usr/local/bin/python2.7 APIGateway.py -f gateway-props.json -a joingateway

Enter the weblogic credentils when prompted.
Enter the Gateway Manager user when prompted (set up in the API Management Portal - you can use the main user that was used to create the API Platform if needed).
Enter the Gateway Manager Runtime user (same as above).

If successful, one of the last messages will be 'Join request sent, please login to the APICS portal as gateway manager to approve the request':


25. Log back into the API Management Portal, click Gateways, click the Nodes icon, click the Requesting tab and we should see our Gateway Node trying to join:


26. Hover over the Gateway Node name and Approve, Reject, Dismiss options should appear on the right:


27. Click Approve and a description for your action (useful if you are Rejecting the Join request):


28. Now, we will see the Gateway Node under the Active tab:


29. One final look to check our API Gateway Node status and confirm all is as expected:


That's it folks, well done! The fundamentals of the API Platform Cloud Service are complete. In Part 3, I will create and deploy a sample API Application and show the Platform working end to end.


Useful Things to know:
1. Logs: If you encounter failures or issues, inspect the Gateway logs that are created. These will contain more information than what is displayed in the terminal when configuring the Gateway.

2. Starting the servers taking too long: This can be due to there not being enough entropy (randomness) in the OS. This can be resolved with the following command:

export CONFIG_JVM_ARGS=-Djava.security.egd=file:/dev/./urandom

3. Domain Administrator validation: Initially, when I tried to install the gateway, it failed. After investigating the logs, my domain administrator username/password vailed validation checks. (I set the password as 'welcome1'). The validation checks are:


3. Polling: The API Gateway Node will poll the Logical Gateway on the cloud or 'phone home' every X minutes to update it self with the latest deployed API's, policies etc. This value can be modified on the API Management Portal - Gateway Node page. The interval value or interval type can be changed:


4. API Gateway Status - Make use of the status command to get a summary of the Statuses and other Useful information. I ran the status command before I created and joined the Logical Gateway:

5. Best practises & Lessons learnt: Luis Weir has posted a helpful presentation covering these aspects, view the presentation on Slide Share here.